0

Your Cart is Empty

1001 Nights and a Marble Run

January 26, 2020 4 min read


1001 Nights and a Marble Run!  

Guest post by “BuildingWithRainbows

Grimms 1001 Nights Building Block Set Available in Canada and the USA at Modern Rascals

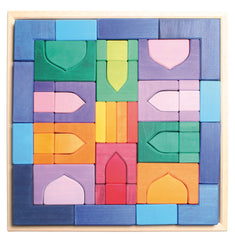
There’s little doubt that the Grimms Wooden Toys 1001 nights set is striking and absolutely gorgeous.  The kids, the parents, the great-uncles—no one who visits our house can resist it.  It makes amazing castles, intriguing towns and generally just has a great variety of shapes.

Have you ever used it for a Ball Run?  Bridges and tunnels are popular features in marble runs here, and I couldn’t help but notice the wide arches fully span the Grimms Building Boards, and the small ones are able to balance on top.  Take a look at what you can build with just 1001 nights + one set of the Grimms Building Boards.  This run is tailored to work with the Grimms Marbles (and the Grapat ones probably work just as well).

Needed:

  • Grimms 1001 Nights Building Block Set
  • Grimms Building Boards
  • Grimms (or Grapat) Marbles

This one takes a little bit of time, but we loved it and thought it was worth the effort 😊 Here’s how you build it, from the ground up (and check out the cool way these blocks get used along the way!)

1. Start with the longest building board, propped up on one of the longer flat pieces

2. Next add two narrow arches and one wide arch.  One narrow arch is flat on its side, on the elevated end of the ramp.  The other stands *on* the ramp at the other end.  The wide arch straddles the board next to the flat arch, but rests on the ground.  The flat small arch will be used to help the ball change direction between levels later on.  (I ADORE this feature!  The big kid here loves having marbles drop and change directions, but was always getting frustrated when they overshoot—with this they make a satisfying direction change) 

3. Add the two blue “L”s as shown. These will be supports for future layers. The wide base of the “L” s make much sturdier supports than straight blocks!

 4. Next add the second-longest building board.  It should slope in the opposite direction from the bottom ramp.  Right now—test how it works so far by running the marble down the ramp a few times.  Slide the ramp back and forth a little bit until you have the board adjusted so that the marble consistently lands in the hole.

 5. To build the next layer, put a large arch on the small blue “L”s, a cube on top of each of the large blue “L”s, and then a small arch at each end of the board.  The low end of the board has the standing arch to create the high end of the next ramp, the high end of the board as a sideways small arch to catch the ball as it comes in from the next higher ramp. 

6. Add the next longest building board, again, send a marble though it a few times to get the position just right so the marble lands in the catcher below. 

 7. Place a large arch so that it stands on the two cubes placed in step 5.  Place two small arches as shown. 

8. Add one last board on top, and the orange pieces as guides. The expanding V gently drops the marble on the board but also gives it a straight trajectory.  Because those two bigger pieces are heavy at the one end, I added the two small on the other to help balance the board.  Interestingly, for me, they gave enough friction just putting them on the sides, but you could also set them on top of the board and they would function as bumpers to help guide the marble into the hole. 

Time to give it a try!   

This run is elegant (I think) in how few pieces it takes to make it work, but if you don’t feel inclined to fidget the angles, don’t hesitate to add guide rails to help keep the marbles on track any place they’re falling off or getting stuck.  I’ve left them out of the pictures because each build will need a slightly different set, and it’s easier see the basic structure without them.   For my son, adding the guard rails is the most fun part of any build! (sometimes I really have to bite my tongue when I’m wanting to finesse it and he’s anxious to add all the walls!).

 As I was putting the marble run away, I tried this out—I think it would be a really cool way to start to the run—if you try it let us know!

This one is less marble run, more game, but still only uses the 1001 nights, one set of building boards and the marbles. 

We Flipped the tray from 1001 nights upside down and propped it up on the two larger “L” pieces.  The top of the ramp is elevated using a few of the arches.   We opted for a long building board for a less-steep ramp so the marbles wouldn’t fly off the set.   If you wanted to slow it down, you could also add a piece of felt (this would also be a good way to add friction if your blocks/tray are not grippy enough) - older versions of the trays came with a felt insert, however the versions in the last few years do not come with felt. 

This one is an oft-repeated game at our house (each catcher has different points values = math game!)—I’d also love to integrate it into a marble run some day!

Happy building!

- buildingwithrainbows

Leave a comment

Comments will be approved before showing up.